ROM Writerを使ったBIOS改変 (NVMe driverをねじ込む)
やっぱりUSB経由のブートはかっこよくないなー、と。
toshiomi-moriki.hatenadiary.jp
ROM Writer入手
USB Programmer Module CH341A SOIC8 Clip 1.8V Adapter SOIC8 Adapter https://amzn.asia/d/4FGaSH0
CH341Aはこの界隈ではスタンダードみたいですね。 安価だし、そもそも説明書も何も入ってない。
やったこと
- UEFIToolを使って、NvmExpressDxe_Small.ffsをBIOSファイルに組み込む。
- 裏蓋を開ける。
- バッテリーとCMOS電池を外す。
- BIOSチップを探して、クリップで挟む
- 本体にケーブルを接続(USBーAで親PCにつなぐスタイル)
- 親PCと接続
- 親PCから、flashromコマンドを実行
作業中の図など。

ログとか。
$ sudo flashrom -p ch342a_spi -c MX25L6406E/MX25L6408E -w spi_backup_w_NVMe.bin
flashrom unknown on Linux 6.8.12 (x86_64)
flashrom is free software, get the source code at https://flashrom.orgUsing clock_gettime for delay loops (clk_id: 1, resolution: 1ns).
Found Macronix flash chip "MX25L6406E/MX25L6408E" (8192 kB, SPI) on ch341a_spi.
This flash part has status UNTESTED for operations: WP
The test status of this chip may have been updated in the latest development
version of flashrom. If you are running the latest development version,
please email a report to flashrom@flashrom.org if any of the above operations
work correctly for you with this flash chip. Please include the flashrom log
file for all operations you tested (see the man page for details), and mention
which mainboard or programmer you tested in the subject line.
Thanks for your help!
Reading old flash chip contents... done.
Erasing and writing flash chip... Erase/write done.
Verifying flash... VERIFIED.
色々困ったこと。
トラブル1) UEFIToolが aptで入れるものでは間に合わなかった。git cloneして対処。
(吸い出したBIOSイメージを確認するのは最新版で。実際に NVMe driverをinsertする際には old versionと使い分け。)
古いUEFITool(0.28)をビルドする場合
$ sudo apt install git build-essential qtbase5-dev qttools5-dev qt5-qmake
$ git clone https://github.com/LongSoft/UEFITool.git
$ cd UEFITool
$ git checkout old_engine ### ここが違う!
$ qmake uefitool.pro
$ make -j$(nproc)
$ ./UEFITool新しいUEFIToolを使いたい場合
$ git clone https://github.com/LongSoft/UEFITool.git
$ cd UEFITool
$ qmake uefitool.pro
$ make -j$(nproc)
$ ./UEFITool
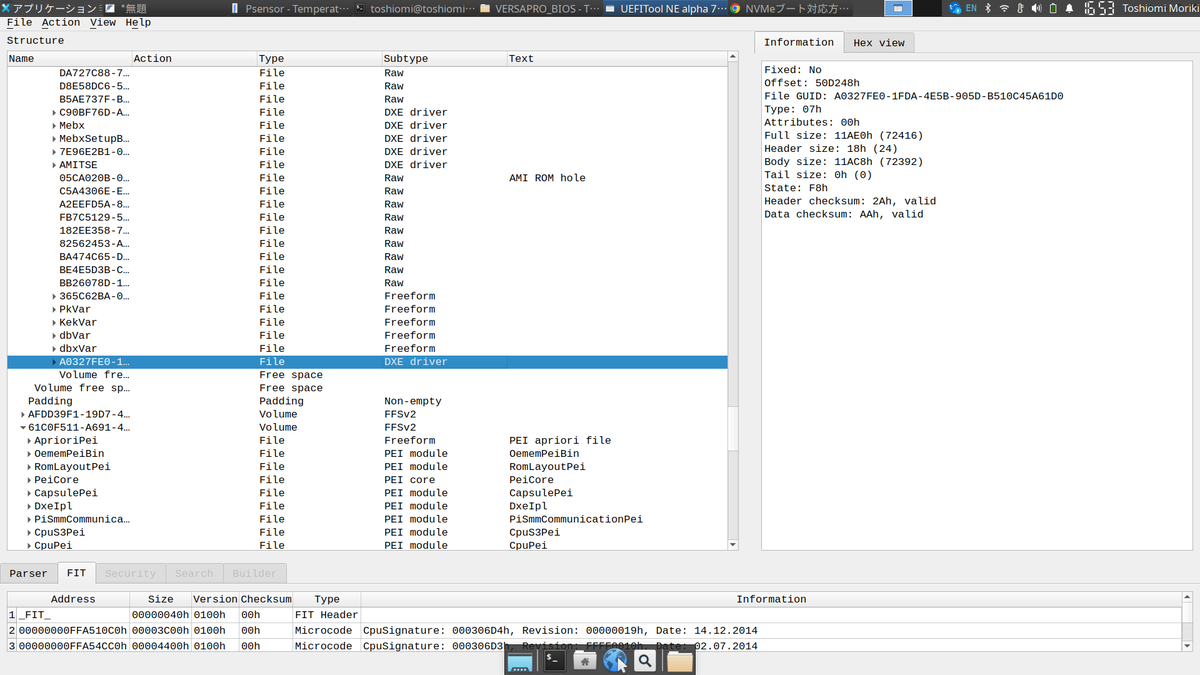
トラブル2) 実際にイメージ焼き込みの際にエラー出まくる。(以下、エラーログ)
→ よくあるらしい。クリップを上から軽く押さえつけて対処。
$ sudo flashrom -p ch341a_spi -c MX25L6406E/MX25L6408E -w spi_backup_w_NVMe.bin
[sudo] toshiomi のパスワード:
flashrom unknown on Linux 6.8.12 (x86_64)
flashrom is free software, get the source code at https://flashrom.orgUsing clock_gettime for delay loops (clk_id: 1, resolution: 1ns).
Found Macronix flash chip "MX25L6406E/MX25L6408E" (8192 kB, SPI) on ch341a_spi.
This flash part has status UNTESTED for operations: WP
The test status of this chip may have been updated in the latest development
version of flashrom. If you are running the latest development version,
please email a report to flashrom@flashrom.org if any of the above operations
work correctly for you with this flash chip. Please include the flashrom log
file for all operations you tested (see the man page for details), and mention
which mainboard or programmer you tested in the subject line.
Thanks for your help!
Reading old flash chip contents... done.
Erasing and writing flash chip... FAILED at 0x002600c0! Expected=0xff, Found=0x4d, failed byte count from 0x00260000-0x00260fff: 0xf30
ERASE FAILED!
Reading current flash chip contents... done. Looking for another erase function.
FAILED at 0x002600c0! Expected=0xff, Found=0x4d, failed byte count from 0x00260000-0x0026ffff: 0xfe48
ERASE FAILED!
Reading current flash chip contents... done. Looking for another erase function.
FAILED at 0x002600c0! Expected=0xff, Found=0x4d, failed byte count from 0x00260000-0x0026ffff: 0xfe48
ERASE FAILED!
Reading current flash chip contents... done. Looking for another erase function.
FAILED at 0x00000010! Expected=0xff, Found=0x5a, failed byte count from 0x00000000-0x007fffff: 0x3c4d7c
ERASE FAILED!
Reading current flash chip contents... done. Looking for another erase function.
FAILED at 0x00000010! Expected=0xff, Found=0x5a, failed byte count from 0x00000000-0x007fffff: 0x3c4d7c
ERASE FAILED!
Reading current flash chip contents... done. Looking for another erase function.
Looking for another erase function.
Looking for another erase function.
No usable erase functions left.
FAILED!
Uh oh. Erase/write failed. Checking if anything has changed.
Reading current flash chip contents... done.
Good, writing to the flash chip apparently didn't do anything.
Please check the connections (especially those to write protection pins) between
the programmer and the flash chip. If you think the error is caused by flashrom
please report this to the mailing list at flashrom@flashrom.org or on IRC (see
https://www.flashrom.org/Contact for details), thanks!
toshiomi@toshiomi-u38n:~/Downloads/VERSAPRO_BIOS$ sudo flashrom -p ch341a_spi -c MX25L6406E/MX25L6408E -v spi_backup_w_NVMe.bin
flashrom unknown on Linux 6.8.12 (x86_64)
flashrom is free software, get the source code at https://flashrom.orgUsing clock_gettime for delay loops (clk_id: 1, resolution: 1ns).
Found Macronix flash chip "MX25L6406E/MX25L6408E" (8192 kB, SPI) on ch341a_spi.
This flash part has status UNTESTED for operations: WP
The test status of this chip may have been updated in the latest development
version of flashrom. If you are running the latest development version,
please email a report to flashrom@flashrom.org if any of the above operations
work correctly for you with this flash chip. Please include the flashrom log
file for all operations you tested (see the man page for details), and mention
which mainboard or programmer you tested in the subject line.
Thanks for your help!
Verifying flash... FAILED at 0x002600e0! Expected=0xaa, Found=0x2f, failed byte count from 0x00000000-0x007fffff: 0x1abdd2とはいえ、読み直してみたら書き換え前のデータと同じのようなので文鎮化は避けられそうだった。
$ sudo flashrom -p ch341a_spi -c MX25L6406E/MX25L6408E -r read-after-verifyfailed.bin
flashrom unknown on Linux 6.8.12 (x86_64)
flashrom is free software, get the source code at https://flashrom.orgUsing clock_gettime for delay loops (clk_id: 1, resolution: 1ns).
Found Macronix flash chip "MX25L6406E/MX25L6408E" (8192 kB, SPI) on ch341a_spi.
This flash part has status UNTESTED for operations: WP
The test status of this chip may have been updated in the latest development
version of flashrom. If you are running the latest development version,
please email a report to flashrom@flashrom.org if any of the above operations
work correctly for you with this flash chip. Please include the flashrom log
file for all operations you tested (see the man page for details), and mention
which mainboard or programmer you tested in the subject line.
Thanks for your help!
Reading flash... done.$ sha256sum *.bin
620b0d1dbd8db389660f8bcfdf1fe2db35b9ebadcabc99b6cd32c8a1a22e7432 read-after-verifyfailed.bin
620b0d1dbd8db389660f8bcfdf1fe2db35b9ebadcabc99b6cd32c8a1a22e7432 spi_backup.bin
b8b4ede9235610e4827a3553bfbdc07c3c2ffd77037b6d6b9700cc91f3a5e569 spi_backup_w_NVMe.bin
すんなり行ったような書き方してますが。。。
実際はまぁ、ありとあらゆるところで引っかかりました。
- そもそもIntel FPTでソフトウェア的に書き換えたかったのだが、このNEC機はBIOS改変を念入りに潰されていた模様。
- ROM Writerを使うのが初めてなため、届いた部品のどれ使っていいのかわからず。
- それでもChatGPTに聞きながら進める。
- 最初の1回目は違うチップ(EEPROM, 64kB)につないで読み出してしまう。(が、これのおかげでROM Writer自体は動いていることを確信)
- 本命のBIOS Flashにつなぐも、全くつながってくれない。
- どうもクリップの接触が怪しいらしい。目を皿のようにしてクリップ接続を何度も試行。
- たまたまうまく読めるようになる。
- 念の為、2回読み込んでハッシュが違っていないことを確認。
- が、書き込みの際に eraseができない現象に遭遇。(上述の書き換えエラー)
- さらに念の為、SPI経由で読み出したBIOSイメージをUEFIToolで書き換える。
- ダメ元で、クリップを押し付けながらの書き込みを再試。
→ うまく行った!
NEC Ultrabook / Corei5 5200u入手
やっぱり液晶がきれいなラップトップがいい、と思い直しまして。
投げ売り横行しつつも、状態が良い機種が少ない予感。
価格.com - 『ボトムカバー交換…するもまた変形の兆し』 NEC LaVie Z LZ550/HS PC-LZ550HS のクチコミ掲示板
発熱により「マグネシウムリチウム合金」の腐食が進んでボコボコになるとか。。。 最初は裏蓋のネジを外すのにも苦労した。^^;
裏蓋、および内部マザーボード写真
裏蓋のボコボコぐあいに正直引くが、内部は思ったよりキレイ。
お品書き ・・・ さて、どう料理しようか?
- 2280 NVMe SSDに差し替えて動かしてみる。
→ BIOSがNVMe対応してないことが判明。USB経由でブート成功。
USBメモリの中身はこんな感じ。startup.nshさえ書いとけば自動ブート可能。(NVMe boot via UEFI shell - Google ドライブ)
$ ls ./startup.nsh
./startup.nsh
$ cat ./startup.nsh
load fs0:\efi\boot\NvmExpressDxe_Small.efi
map -r
fs0:
\EFI\ubuntu\shimx64.efi
$ tree EFI/BOOT
EFI/BOOT
├── NvmExpressDxe_Small.efi
├── RU.efi
├── Shell.efi
└── bootx64.efi1 directory, 4 files
$
NVMe速度確認
ADTECさまの1TB NVMe SSD。この機種ではPCI-e gen2 x4レーンで認識されているようで、若干カタログスペックより性能低い。が、SATAより3倍くらい速いので特に不満はない。

ASUS X202E入手
省電力厨の信条に反して、Corei5のラップトップを入手しました。
○ サスペンドした状態で充電できる。(え、当たり前?)
○ SATA SSDが刺さる。(え?)
○ タッチパネル!
△ CPUファンが若干うるさい。
△ TN液晶で画質が悪い。
△ グレアでギラギラ → SANWAさんの非光沢フィルムを貼り付けて対応。
液晶の画質をどうにか使えるレベルにするのは骨が折れる・・・
とりあえず、以下で様子見。
- xgammaで見え方を微調整、(~$ xgamma -> Red 0.700, Green 0.700, Blue 0.500)
- DPI指定を上げる、(96 -> 120 dpi)


Conkyセットアップ、とか
軽量Linuxユーザ、ご用達のConkyをセットアップしてみました。

限りなく自己満足だけど、なんとなくひょろひょろ動いているのはいい気分。 設定ファイルはこちら。(~/.conkyrc)
それとは別に、Ubuntu 22.04 -> 24.04へのアップグレードを試してみましたが、不具合連発したため元に戻してしまいました。 Intel(R) Atom(TM) x5-Z8300 CPU @ 1.44GHzという、口悪い人から言わせると産業廃○物なCPUのせいかもですが。
Core i7 3770Sを DELL Optiplex 7010に搭載。
安価にi7 3770Sが入手できたので差し換えてみた。メルカリさまさま!

2コア→4コアなので、めっちゃすごいかっていうとそうでもないけど、余裕は生まれた気がする。
65Wの割には Idle時は静かな感じ。

久々に箱を開けてみて判明した事実。以前、わざわざ gen2のポートに NVMe変換カードを差していたことが判明。 せっかくだから gen3ポートに差し換えておいた。まぁ、自己満足なんだけどね。
- GPU用の青いスロットがCPU直結で gen3 x16, 黒いスロットがQ77チップセット接続で gen2 x4ということらしい。 なるほど・・・ PCIe bifurcation(分岐)には対応してたらもっと面白かったのだけど。

Crystal Diskmarkを動かしてみた。微妙に性能落ちている気がするが、まぁいいか。

P.S. Crucialのキャッシュマネージャを再度有効化。

Chuwi Hi10 ProにSDカードを追加
64GB eMMCでは容量的に不足してきた
snap管理のアプリを入れてると、どんどん減ってく印象。
ポチッとな。
速度確認。

/homeをこれにしてしばらく凌ぐか。
フォーマットは nilfs2。
疑問点。
- micro SDを挿した状態でブートすると、デバイス番号(/dev/mmcblk1 or mmcblk2)がズレる。
- nilfs2 partition(/dev/mmcblk1p1)が、blkid一覧に出てこない。
- したがって、UUIDや LABEL指定でのmountができない。
これ、なんでだろ。。。?
lsblk出力
$ lsblk -f | sed /loop/d
NAME                FSTYPE      FSVER    LABEL UUID                                   FSAVAIL FSUSE% MOUNTPOINTS
mmcblk2
├─mmcblk2p1         vfat        FAT32          236B-00F9                               504.9M     1% /boot/efi
└─mmcblk2p2         LVM2_member LVM2 001       RF0PAX-P3ZQ-mlLa-78NM-hMJn-NMoL-sjl2IT
  ├─vgubuntu-boot   ext4        1.0            88e5d6d1-ab01-4c2e-8691-fd855797a1f4    256.4M    40% /boot
  ├─vgubuntu-root   ext4        1.0            5e2806bd-e1b5-4379-824c-0e549df48123     12.9G    70% /var/snap/firefox/common/host-hunspell
  │                                                                                                  /
  └─vgubuntu-swap_1 swap        1              1f9b9fe5-9d37-426f-97b8-867cbed27999                  [SWAP]
mmcblk2boot0
mmcblk2boot1
mmcblk1
└─mmcblk1p1                                                                             91.3G    16% /home
追記
- blkidが出てこない件、ext4で一旦フォーマット -> mkfs.nilfs2で再フォーマット、で解決した。
・・・これは nilfs2ツール側のバグなような気がするが。
$ lsblk -f
NAME                FSTYPE      FSVER    LABEL UUID                                   FSAVAIL FSUSE% MOUNTPOINTS
mmcblk1
└─mmcblk1p1         nilfs2      2        home  0276b33d-4f4c-432a-afde-2794b439d36b     61.3G    42% /home


